Ok, so I've had this site bookmarked in Chrome for a year, but I've never really monkeyed with it much. For what it's worth, I hadn't played with it enough to even realize there was a pay option/free design choice to make. The Beer Labelizer is just an incredibly cool website for creating appropriately sized labels for your homebrew! They have a number of free designs, and a boatload of "premium" members-only designs. Membership is only $5 through PayPal (not sure how long that membership is for...will update when I hear back from the owner.)
Anywhos, very easy to edit the most common sections of a beer label: Beer Name, Beer Type/Style, two separate "tag lines" with recommended fills of Brewery Name and Brewed By, but easily filled elsewise if that suits your needs better (such as "occassion/event name" for anniversary/wedding brews, etc.) There's also spots to fill in ABV and bottle size. Any and all lines can be left blank for a "cleaner" label, though none of the designs are "clean" enough for satisfactory black&white printing. You will likely want to have any labels created through the Beer Labelizer printed at a professional copy house, like Kinkos or your local equivalent. (Pony up for color laser printing, though plain paper is fine. Do the milk label thing to get them stuck to your bottles. Plus, your local copy house likely has a paper cutter of convenient size to cut the pages down for you...)
If the membership thing seems worthwhile, you can even add .jpg images to your labels. Freakin' uptown and guaranteed to impress the neighbors and in-laws! :-) (Can you say "engagement photos for those wedding brews? Wedding photos for those anniversary party brews? Name the occasion, I'm sure you have a picture for it! A picture is worth a thousand words, but a good brew can make you forget half the words you've read.
Once printed and cut to size, just pour a little skim milk on a plate, dip each label to moisten and slap those puppies on! They'll hold through refrigerator condensation, but will still rinse right off with some hot water once you've shared your great-tasting and great-looking homebrew!
All in all, very cool stuff to make your homebrew look as good as it tastes! :-)
Tuesday, April 1, 2014

Monday, March 24, 2014
Raspberry! Boysenberry! Strawberry! That's my Jam!
Infectious Groovalicious!
Stripped some more bottles while cooking up a raspberry wheat. The raspberry is gonna come from a bottle this time. Coupla more kits and we're gonna go off the grid, but we're gonna nail the process first.
These ingredients came from MoreBeer in the form of Berry Beer Kit. Here's a pic of it unboxed:


 Once we got through that bit of ugliness, the Kitchen ended up with 4ish gallons in the fermenter.
 And yes, the fermenter gets to wear my Wingman Brewers T-shirt for the next week or so! I realize that Speidel is opaque, but I'm still paranoid about light-struck brews.
 And here's what's left in the brew kettle after the wort's been drained: ugly muck of a mess!

Stripped some more bottles while cooking up a raspberry wheat. The raspberry is gonna come from a bottle this time. Coupla more kits and we're gonna go off the grid, but we're gonna nail the process first.
These ingredients came from MoreBeer in the form of Berry Beer Kit. Here's a pic of it unboxed:
Pretty much the standard procedure. The kit did include a Whirlfloc tablet, intended to be added 5 minutes before the boil ended. It's meant to clear the brew by causing proteins to coagulate during the "cold break" (when stuff drops loose as you cool from a full boil to yeast-pitching temps.) I trust it did its stuff, as the wort got ugly! OK, more than ugly, extremely gross and disgusting looking. Yeesh!
Sunday, March 23, 2014
Cap That! and Stripping Labels
After bottling those last coupla batches, I realized I needed to get busy prepping bottles for the next few. So...it's time to strip some labels. Big tub, bottles needing stripped, enough water to drown a moose, a coupla scoops of Oxyclean and an hour soak. Poof, those labels fall off easier than you forget it was just a two-drink minimum. Some brands use some freaky sticky glue, but most labels fall right off after a good soak. A light pass with a scrubbie to remove any residue, and they'll be ready for rinsing and sanitizing.
 Before I got busy cleaning empties, I made some cap labels for the batches just bottled. I'll make milk labels for them later, but I wanted to get the caps labelled right away--I don't want to get any of the bottles mixed with other batches! Avery 5408 are freaking perfect for this: 24 to a sheet, so you can do a case with each page; and exactly bottle-cap sized. Since I didn't have full cases of either batch just bottled, I used a couple of the extras to tag the boxes before moving them into the pantry.
Isn't Find and Replace All one of the most useful buttons ever??? Woot! (Completely beside the point for cap labels, but get a cheap little Brother 2200 series if you want to do inexpensive milk labels for the bottles themselves. Laser printer labels won't bleed, and those Brother 22xx series are cheapest cost per page you will find anywhere!)
 Once you have cap labels on your homebrew, you can consolidate cases if you need to conserve some storage space, and still find that bottle.

Up tomorrow night in the Kitchen: raspberry wheat cook from a kit from MoreBeer. Hopefully spring will actually have sprung about the time this porch swing beer will be ready to rock!
It's gonna be cold and nasty again next week, but by the time this porch swing beer is ready to tap, it should be just the ticket! In the meantime, drive like a maniac and jump like a crocodile!
 |
Saturday, March 22, 2014
Bottle Daze
It's Bottle Day for B) Endarkenment 2.0, my second attempt at Chocolate Peanut Butter Brewing Goodness!
All y'all might recall last years attempt ended up being a huge messy muckety mess, that failed to pick up even a hint of peanut butter flavor. And it tasted terrible for the first 6 months! Once it hit it's flavor stride, it kicked ass and was absolutely the best beer I made last year. But I only found one bottle with even a hint of peanut butter! It still had enough potential that I was very willing to give it another shot this year. There were some mishaps in the Kitchen, but it seemed to be working out. The yeast seems to have laid down once the gravity hit 1.035, so instead of adding "priming" sugar to a racking bucket, I'm going to try using Prime Dose Carbonation Capsules. I've never used these before, but they seem tailor made for my intended use: carbonating bottles of a brew where the original yeast has stalled out for whatever unknown reason. (I'm guessing lack of oxygen and/or too high an alcohol content? But what do I know? I'm just mucking about in the kitchen!)
Stopped by Liquor Barn to snag some brews earlier today, and snagged a new bottle filler. I love the 3/8" filler that came with my original "brew kit," but those fancy Speidel fermenters that I've been bragging on come with a 1" spigot. I could stretch out the 3/8" tubing to fit, but then I'd have a leaky mess next time I bottled from anything else. So I'm gonna give this new filler tube a shot. I fill my bottles on the dishwasher door, so if it's not working out, I shouldn't make too big of a mess. (OTH, I usually make a pretty big mess regardless, so we'll see... and no, there likely won't be pictures or video if it gets messy!)

Yesterday, I started rinsing off bottles and set up my sanitizer bottle tree. I wanted time to get everything sanitized AND time for the bottles to air-dry. And I do love the little sanitizer bottle tree. I might want to add to it's height/bottle capacity, but it's built to expand. and the "spray top" is just too handy for making sure all my bottles are completely sanitized.

Yep, that 5 gallon speidel with the blankets lovingly wrapped around it is the one getting dropped to bottles tonight. The blanket wasn't so much for love or to keep it warm...mostly to keep the light out. Smaller fermenters just get a borrowed T-shirt. (They are happy, and well-cared for. No emails about them not receiving equal treatment, please. Besides, the one in the T-shirt looks soo much cooler.)


Nearly three cases run through the sanitizer, so I should be plenty good to go. Caps sanitized also. Fillers and tubing sanitized. We're just freaking golden here, I hope!
Well, that 1/2 inch tubing is fine for dropping wort from one container to a lower receptacle with those Speidel spigots, but the back-pressure from a closed filler tube was enough to sprew brew everywhere! Yeesh! Ended up heating the 3/8 inch tubing with hot water enough to stretch-fit it. Lots of beery, chocolately mess! Ended up with 36 bottles capped and happy. BTW, putting the cocoa nibs in a mesh "hops" bag before adding them to the secondary fermenter was an awesome idea, and saved a boatload of cleanup. (Took days to get those damn things out of the filler tube last year!)
Now, since the yeast seems to have stalled a little early (1.035 sg) I thought it a perfect opportunity to try out my Prime Dose Carbonation Capsules. Little pills of yeast and yeast nutrient: add two to each bottle, and consider it good. Easy to use, but a little pricey--on the other hand, much less pricey than a batch that didn't carbonate! I'll update once these bottles get opened. Ended up with only 36 bottles out of 4.5 gallons...the rest was left soaking in peanut butter sludge.
----------------
Fast-forward a week, and it's now Bottling Day for the chocolate milk stout that's been in my 7.5 gallon Speidel for two weeks now. No activity in the airlock for a week, and it's dropped from 1.060 OG to 1.025 (that's with the 8 oz. of lactose that was added.) With a net 4.5 gallons in the primary, I'm OK with the numbers. Normal routine of boil the priming sugar, drop the simple syrup into the priming bucket and add a bottle of chocolate extract flavor.
 Couldn't resist another pic of my happy sanitized bottle caps!
Here's the Priming Bucket with the filler tube attached and beer runnin thtough it. On the left of the pic, you see my 7.5 gallon primary. Its just been emptied, so it was promptly filled with Oxyclean to soak the grunge off the insides.
 Here's a pic of my two current bottle cappers. The one on the left is the more recent addition of a red baron bottle capper. It has a magnet in the center that makes it much easier to cap individual bottles, very smooth and well-built. On the right is the capper that came with my original equipointment. A little more unwieldy than the red baron, but it works...and at times where the newer fancier cappier can't! I had several Abita bottles in my mix of washed and ready, but the Red Baron couldn't cap those puppies! Yikes!!! The old standby scrunched lids on those bottles, no problem. (I'm still thinking, "Don't bother saving Abita bottles. Bummer, since they use those cute little stubby 12s.)

Fast-forward a week, and it's now Bottling Day for the chocolate milk stout that's been in my 7.5 gallon Speidel for two weeks now. No activity in the airlock for a week, and it's dropped from 1.060 OG to 1.025 (that's with the 8 oz. of lactose that was added.) With a net 4.5 gallons in the primary, I'm OK with the numbers. Normal routine of boil the priming sugar, drop the simple syrup into the priming bucket and add a bottle of chocolate extract flavor.
Here's the Priming Bucket with the filler tube attached and beer runnin thtough it. On the left of the pic, you see my 7.5 gallon primary. Its just been emptied, so it was promptly filled with Oxyclean to soak the grunge off the insides.
Chocolate Stout ended up at 43 bottles, capped and waiting. The taste I had while testing the final gravity was pretty decent, so I'm going to try one of these fairly soon! (Mebbe in a month?)
That's it for now, folks--drink like a chimney, and jump like a crocodile! :-)
That's it for now, folks--drink like a chimney, and jump like a crocodile! :-)
Saturday, March 15, 2014
Cookie Shot Fail and Milk Stout Brew Night
Didn't get around to posting this last weekend, but here's what was happened in the Kitchen:
The weekend started with my first attempt at Chocolate Chip Cookie Shot Glasses. Heard about these on the internets, and thought "surely I could do that in the Kitchen." So I ordered a Fred Cool Shooters Shot Glass Mold from Amzn, and stopped for cookie dough on the way home from work.

Next up in the kitchen was my Milk Stout brew night. I'm using Midwest Supplies Cream Stout Extract Kit, but I'm going to add some chocolate flavor before bottling. I opted for a Wyeast 1028 London Ale yeast smack pack for this one. It's a pretty simple kit so brew night went fairly smoothly.

Once the brewing is done, it's time to cool things off in a hurry. I just love my copper coil wort chiller--plunk it in your kettle 15 minutes before your boil is done to sanitize it, then just run cold tap water through it. 30 minutes later, your boiling kettle is down to 70ish temps and ready to move to your fermenter. Huge time and effort saver. Being made of copper, the wort chiller being added to the boil for the last fifteen minutes supposedly affords a similar beneficial reaction with the wort as would using a copper boil kettle, but much less expensively. Most importantly, it saves me having to try to move the boiling kettle off the stove and into a tub of ice.


After it was cooled, dropped the wort into my 7.5 gallon Speidel fermenter, added the smack pack of yeast and capped it off. Then I added some cheap vodka to the airlock* and drug the whole thing out to the living room. Normally, I'd leave the fermenter in the closet with the water heater, or the pantry by the garage door, but it's been a little chilly in both places. I was getting a little nervous about the yeast, since I didn't see any activity until Wednesday, but once it got active, it stayed pretty busy for a bit. It's still active enough that I won't be able to bottle this weekend, but that's ok--I have the second stab at my B) Endarkenment Chocolate Peanut Butter Stout to bottle this weekend. Though I outsmarted the cacao nibs this year by enclosing them in a hops bag before adding them to the secondary fermenter, the peanut butter powder was enough of a mess last year that I know I will appreciate the lack of anything else needing my attention this weekend!
*I love my Speidel fermenters. They're kinda pricey, but they're built extremely well, have great spigots so I don't have to use an auto-siphon, super easy to move with their sturdy handles and easy to clean with their wide-mouth openings. I'm not terribly fond of the airlock that comes with them, and will likely start using my standard 3 piece airlocks with them instead. (They work fine, just they are very, very large...so more cheap vodka, and a little bit more difficult to see activity. Just me being a bitchy fuss-budget, mostly.)
So...that's what happened in the Kitchen last weekend...not sure if anything much is gonna go on this weekend or not. If there is any shit happenin' in the kitchen this weekend, all y'all will hear about it ... sooner or later. In the meantime, drink like a chimney and jump like a crocodile!
Monday, March 3, 2014
Chocolate Peanut Butter Kitchen Adventures
Ok, folks...Sorry I didn't get the start of this nonsense up last week, but activities in the kitchen got a little more exciting than I'd hoped. Anywhos...I posted the unbox of ingredient kits a couple weeks ago, and last week it was definitely time to get one of those kits brewed up! Since this is my first post regarding the actual brewing that happened in my kitchen, I'm going to go into way more detail for this one than I ever will again. If you're familiar with home-brewing and don't want to see where my process might differ from yours, you might wish to skip through fairly quickly. (And mebbe the next few too? I skipped a lot of photo ops!)

So after everything got rinsed off, the pots moved to the stove. The smaller two aren't planned to be used for much other than rinse buckets, but it's good to have some pots sitting about...as I was soon to find out. :-)


I posted this pic of the two Wyeast packets from both kits unboxed last week. The Smack Pack on the left is the Wyeast American Ale 1056 that I will be using with my Chocolate Peanut Butter Stout kit. You can see it's starting to expand a little bit already. This is a very active yeast, and it's not at all uncommon for the pack to expand a good bit before you "smack" it. It makes the nutrient pack slightly more difficult than usual to properly smack, but your yeast is going to be just fine. (It completely freaked me out the first time I used this yeast, though--I was certain the yeast would be all worn out or something!)


Fully expanded, feels like it could burst if you gave it a good squeeze. I decided not to start brewing until the next evening. It's good to sit like this for a bit. Once I start sanitizing equipment, this pack of yeast will get swished around in the sanitizer also.
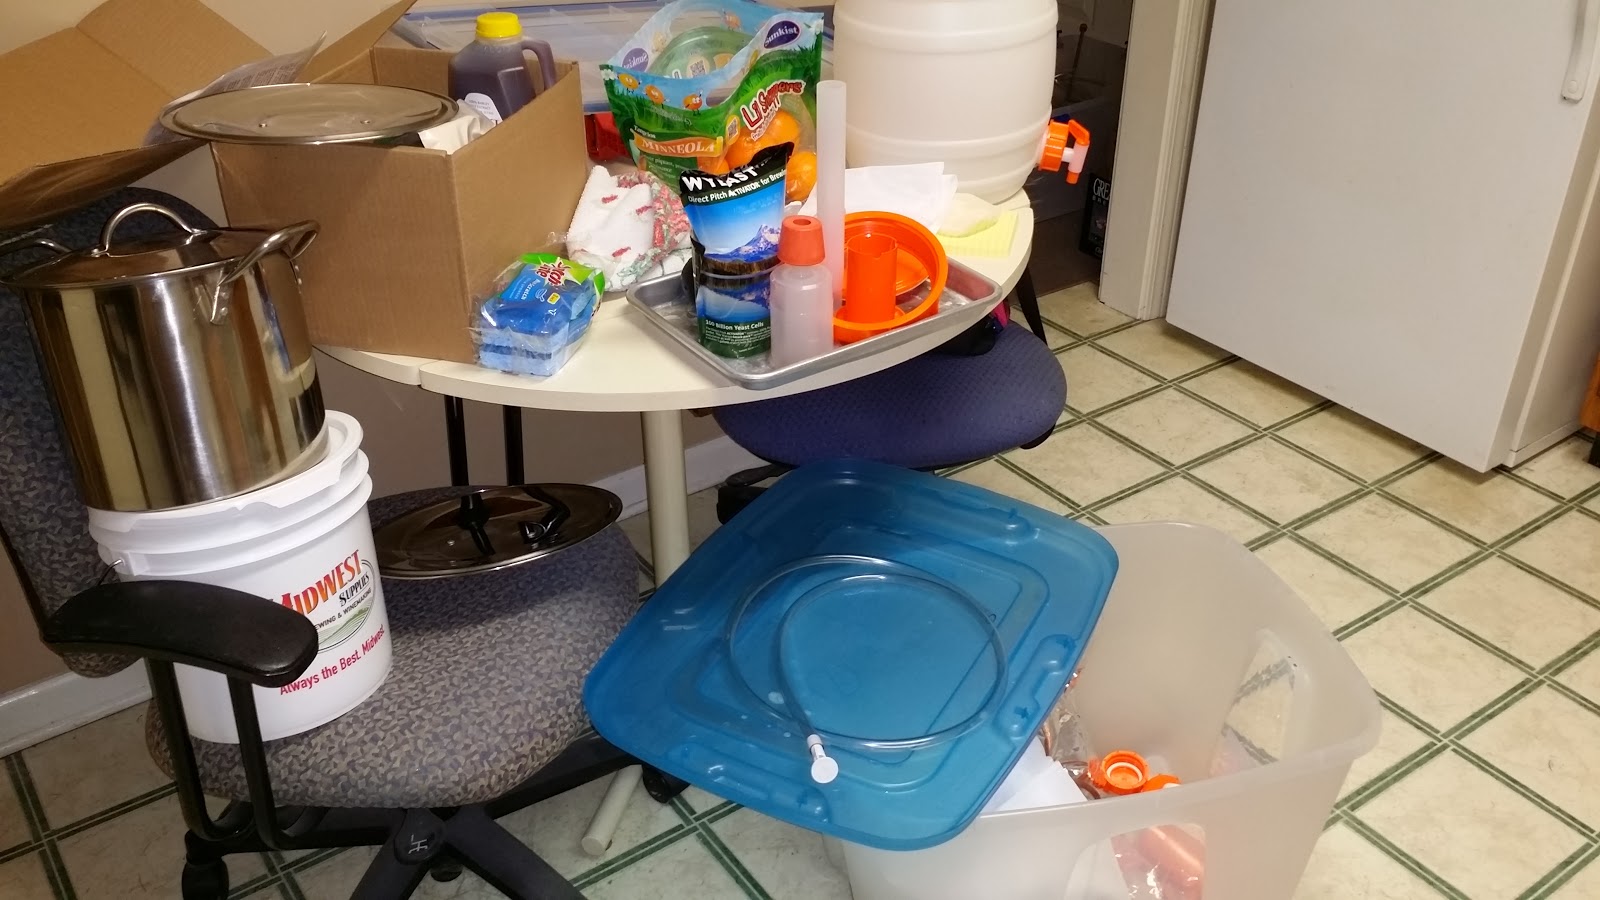
This is not a great pic, but it's most of the stuff that got sanitized. Along with all kinds of crap piled on my kitchen table that doesn't have anything to do with anything. The yeast packet, the orange lid and air lock for the Speidel fermenter, a siphon tube with a siphon sprayer doohickie :-) to help increase the oxegenation when transferring your wort from the brew pot to the fermenter. (This is the only time you ever want to add any oxygen--once the wort has cooled, and just before you pitch your yeast. The yeast need enough to get started, but adding any later just adds off flavors. This little plastic doohickie doesn't do much, but it was only a couple of bucks, and certainly doesn't hurt anything!)
So, I had everything sanitized Sunday afternoon, just needed to let it all air dry before I got started.
Several hours later it was time to get down to business. I skipped a lot of photo opportunities from this point out...I'll try to do a better job with the next batch. Specialty grains were all bagged up, 6 gallons of water measured into the brew pot, and things got started. I do have an electric stove, so to help bring things up to temp more quickly, and to raise the brew pot off the surface of the stove a little higher, I added what's typically called a "canning element" to my stove last year. Designed for home canning on electric stoves, they're just the ticket for home brewing on an electric stove!

Here is the start of the boil. It's gonna take my poor little electric stove more than an hour to bring that big pot to a full boil.


When I hit a full boil, all hell broke loose...I was going to pull that big grain bag out and let it sit in a strainer over one of my smaller pots while I added the Dried Malt Extract and Liquid Malt Extract to the brew pot. But when I went to pull the grain bag, the grains didn't all come with! I originally thought it had burst a seam, but I think I just didn't have one corner tied tightly enough to hold up to all the stirring about it received. Regardless, it was ONE HOT MESS!!! A good deal of scooping and mucking about with very, very hot liquid, all while trying desparately to NOT stir things about any more than absolutely necessary. (Stirring and adding oxygen to the wort at this point is not going to add anything pleasant to the end result!) Anyhow, after recovering as well as possible, I cranked the heat back up. Once it hit a full boil, I added a hops bag with the 1 oz. Chinook and 3/4 oz. Spaltz. At that point, it's just a matter of watching the clock...while watching the pot to make sure nothing boils over. About 40 minutes later, I added another small hops bag with 1/2 oz of Spalt aroma hops. A few minutes after that, I dropped my copper coil wort chiller in the pot, so it can be boiled sterile. (I need to take a picture of that amazing item doing it's stuff--it's freaking awesome!)

Anyhow, once the boil was done, I started the cold water through the coils, and half an hour later everything was cooled down enough to transfer to that Speidel primary fermenter. Before moving the wort to the fermenter, I did pull out enough wort to test for specific gravity. By floating a glass hydrometer, this will tell me how much sugar is in the original wort; when I test it later, I can tell how much sugar has been converted to alcohol. By comparing this "Original Gravity" to results of the same test later, I'll be able to determine when it is safe to bottle this brew up, if there have been any problems with the yeast (i.e., if more sugars remain than expected, perhaps something has gone wrong with my yeast, etc.,) and I will also be able to determine the alcohol content of the final product.
I woulda swore I took a pic of the test tube full of goodness!?!
So my Original Gravity came out at 1.015 (which seems really high for what I was working with...part of the mash still floating about?) I moved the cooled wort into that Speidel, and pitched my yeast. Capped everything off, topped off the air lock with some cheap vodka, threw a t-shirt over the Speidel to keep off the drafts in the corner of my pantry, and called it a night.
The day after, everything was doing it's stuff..bubbling away as the yeast created CO2 and alcohol. I was glad to have that 7.5 gallon Speidel--last time I made this recipe, it blew the airlock out the top of the fermenter and made a huge freakin' mess! This batch might not have gotten quite that active, but the foamy krausen did climb halfway up the side


Once I had all 5 gallons transferred, I "carefully" stirred the cacao and peanut butter powder into the wort, trying to be as gentle as I could. (hey, you be gentle with a 3 foot spoon swishing round in a 5 gallon bucket!) Anyhow, once I had it stirred as well I could without getting things too excited (at this point, you don't want to add any oxygen, if you can help it) I tightened up the lid, add some whisky to the air lock (the bottle was nearby, and the whisky can be dumped into the brew on bottling day.
After all that mucking about, I'm going to let it sit for a few days. Recipe calls for cacao nibs to be added a few days after moving the brew to the secondary, so we'll give it a good look then. And those cacao nibs are going into a hops bag before being added to the secondary. Took forever to remove those nasty little things from my auto-siphon and bottling wand last year!
Sunday, February 16, 2014
Recent Midwest Supplies Delivery Unbox and the World's BEST Deviled Eggs
As I mentioned last week, I did some major cleaning out in the kitchen and ordered a couple of brewkits online. Between the helpful folks at Midwest Brewing Supplies and UPS, the ingredient kits arrived during the past week. Kinda swamped at work, so mebbe no actual brewing gonna happen this week, but I did take some unboxing pics to share with y'all.
I ordered a Chocolate Covered Beavr Nuts Extract Kit and a Cream Stout Extract Kit, both with the Wyeast Smack Packs recommended for each (Wyeast 1056 American Ale for the choco/pb stout and WL203 London Ale for the Cream Stout.) An ice pack can be added to protect your yeast from temperature variations for a ridiculously inexpensive 79¢. (No unbox pic for the smack packs--they went straight into the fridge.)
So, first up...the Chocolate Covered Beavr Nuts Extract Kit:
I brewed up a batch with this kit last year...I called the end result "B) Endarkenment" (after the Ray Wylie Hubbard song.) I didn't get any peanut butter flavor at all, but after 6 months in bottles, this turned into a fantastic stout! It improved with each passing month, and just amazed me with how good it turned out. I'm down to the last couple of bottles, and looking forward to seeing if I can do a little better job this time around.
Anyhow, the kit arrived in a rather large box, with a bunch of goodies:
 A huge bag of milled grains (nearly 5 pounds! Gonna be some spent-grain dog biscuits for somebody's mutt! LOL), 2 lbs of Light Dry Malt Extract, 6 lbs. of Gold Liquid Malt Extract, several smaller foil pouches with Chinook and Spalt hops, 4 oz. of cocoa nibs (these will go in a mesh bag before adding to the secondary--learned my lesson well, last time!). They include an appropriate amount of corn sugar for bottling day and a muslin bag to put the grains in while steeping. The kit does NOT include the recommended two 6.5 oz bottles of dehydrated peanut butter powder that will be added to the secondary fermenter. (That will need stirred in better than I managed last time! Huge amounts of pb sludge left in the secondary and very little peanut butter taste in the finished product, i.e., none whatsoever!) The kit doesn't recommend a specific peanut butter powder, but I chose PB2. The jars are the right size, and they contain only three ingredients: peanut butter, salt and sugar. No weird additives that might add unexpected flavors while fermenting:

 Much more manageable, and could have been tossed in the fridge whole. But who can resist a peak inside?
 Midwest does a great job of packing their kits!
 6 lbs. of Dark LME (Liquid Malt Extract), a pound of milled specialty grains (8 oz. Black Malt, 8 oz. Caramel 80L Malt), another pound of lactose (milk or cream sugar-thus the name. brewer's yeast cannot process lactose, so this will sweeten the beer without adding alcohol.) a small foil pouch of hops, a small pouch of corn sugar for bottling day (often referred to as "priming sugar," just enough to carbonate the end result without adding flavors or exploding bottles!) Midwest also includes a muslin grain bag, to hold those specialty grains as you brew.
 Ooh, the two-gallon fermenter! One gallon batches without watching the primary like a hawk! We'll see how that works out, but I'd like to start with gallon batches when I bust into creating my own recipes. (or even copying other folk's recipes!)
And for something completely off-topic!!!
 While I was in the kitchen, I felt the need for some devilled eggs. Lord these are tasty!!! And that deviled egg keeper is just the most awesome bit of plastic storage container. Man cannot live by beer alone..
Deviled Eggs Recipe
Half dozen hard boiled eggs
1/4 cup mayo
1 tsp hot mustard
1 tsp pickled jalapeno liquid
1/8 tsp seasoning salt
mix the yolks and other ingredients in a baggie, then cut a corner off to create a piping bag--less cleanup and much easier.And season-salt the whites before you fill them.
I'm going to add 4 oz. of raw cacao powder when I add the PB2 to the secondary fermenter, but that hasn't arrived yet, so you don't get a picture. I am really looking forward to brewing this one up, not only to see if I can improve somewhat on the process from my experience, but because it came out so absolutely awesome!
As I go forward with this brew, I'll add pics and updates throughout the process, as well as repost entries from last year's experience with this kit.
The second kit I ordered, Midwest Supplies Cream Stout Extract Kit, arrived in a slightly smaller box:
 |
| No unboxing, but all y'all do get a pic of the yeasty goodness Wyeast smack packs. The London Ale WL023 is on the right. So calm and cool and waiting to be smacked before dropped into the Cream Stout. That agressive unsmacked Smack Pack on the left is the American Ale Wyeast 1056. That 1056 is already starting to expand, but I've run into that before with this strain from Wyeast. Pain to break the nutrient packet though! I really do like these Wyeast smack packs, it's just nice having such positive verification of your yeast's viability before pitching. |
And for something completely off-topic!!!
Deviled Eggs Recipe
Half dozen hard boiled eggs
1/4 cup mayo
1 tsp hot mustard
1 tsp pickled jalapeno liquid
1/8 tsp seasoning salt
mix the yolks and other ingredients in a baggie, then cut a corner off to create a piping bag--less cleanup and much easier.And season-salt the whites before you fill them.
Subscribe to:
Posts (Atom)